Prerequisites

This guide assumes you’ve completed the steps to create an account, organization, and API keypair as described in the Quickstart section.

Installation

Create a new Next.js app via npx create-next-app@latest. Or install into an existing project.

npm install @turnkey/sdk-react

React 19 Users

If you’re using Next.js 15 with React 19 you may encounter an installation error with @turnkey/sdk-react. Consider:

  • Downgrading React to 18.x.x
  • Using npm install --force or --legacy-peer-deps

You may learn more about this here.

Setup

1

Environment

The following environment variables are necessary to use the Turnkey SDK.

.env
NEXT_PUBLIC_ORGANIZATION_ID=<your turnkey org id>
TURNKEY_API_PUBLIC_KEY=<your api public key>
TURNKEY_API_PRIVATE_KEY=<your api private key>
NEXT_PUBLIC_BASE_URL=https://api.turnkey.com
2

Configure

Fill in with your Organization ID and API Base URL.

src/app/layout.tsx
const config = {
  apiBaseUrl: "https://api.turnkey.com",
  defaultOrganizationId: process.env.NEXT_PUBLIC_ORGANIZATION_ID,
};
3

Provider

Wrap your layout with the TurnkeyProvider component, and import styles from sdk-react.

src/app/layout.tsx
import { TurnkeyProvider } from "@turnkey/sdk-react";
import "@turnkey/sdk-react/styles"; // required to render auth component styles properly

export default function RootLayout({ children }) {
  return (
    <html lang="en">
      <body>
        <TurnkeyProvider config={config}>{children}</TurnkeyProvider>
      </body>
    </html>
  );
}

React 19 Users

@turnkey/sdk-react is built with React 18. If you’re using React 19 you’ll find a type mismatch on the children type.

To fix this, you can use the @ts-ignore directive to suppress the error.

src/app/layout.tsx

<TurnkeyProvider config={config}>  {/* @ts-ignore */}  {children}</TurnkeyProvider>

We’re actively working towards React 19 compatibility.

Authenticate

The auth component contains the UI and logic to handle the authentication flow.

1

Configure

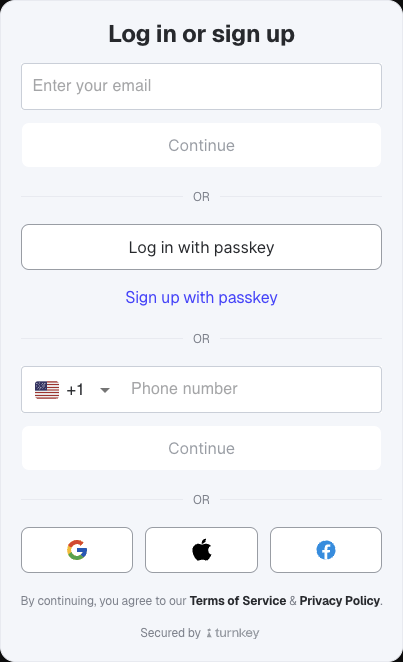
For simplicity, this app will only support email authentication. We have other guides on additional authentication methods. Additionally, you can customize the order in which the auth methods are displayed.

src/app/page.tsx
"use client";

export default function Home() {
  // The auth methods to display in the UI
  const config = {
    authConfig: {
      emailEnabled: true,
      // Set the rest to false to disable them
      passkeyEnabled: false,
      phoneEnabled: false,
      appleEnabled: false,
      facebookEnabled: false,
      googleEnabled: false,
    },
    // The order of the auth methods to display in the UI
    configOrder: ["email" /* "passkey", "phone", "socials" */],
  };

  return <div></div>;
}
2

Import

Import the auth component into your app and pass in the config object.

src/app/page.tsx
"use client";

import { Auth } from "@turnkey/sdk-react";

export default function Home() {
  const config = {
    authConfig: {
      emailEnabled: true,
      passkeyEnabled: false,
      phoneEnabled: false,
      appleEnabled: false,
      facebookEnabled: false,
      googleEnabled: false,
    },
    configOrder: ["email"],
  };

  return (
    <div>
      <Auth {...config} />
    </div>
  );
}
3

Handlers

Define two functions to handle the “success” and “error” states. Initially, the onError function will set an errorMessage state variable which will be used to display an error message to the user. The onAuthSuccess function will route the user to the dashboard after successful authentication.

A new sub-organization and wallet is created for each new user during the authentication flow.

src/app/page.tsx
"use client";

import { useState } from "react";
import { Auth } from "@turnkey/sdk-react";

export default function Home() {
  const [errorMessage, setErrorMessage] = useState("");
  const router = useRouter();

  const onAuthSuccess = async () => {
    // We'll add the dashboard route in the next step
    router.push("/dashboard");
  };

  const onError = (errorMessage: string) => {
    setErrorMessage(errorMessage);
  };

  // Add the handlers to the config object
  const config = {
    // ...
    onAuthSuccess: onAuthSuccess,
    onError: onError,
  };

  return (
    <div>
      <Auth {...config} />
    </div>
  );
}
4

Dashboard: User Session

Add a dashboard route to the app where the user will be able to view their account and sign messages.

src/app/dashboard/page.tsx
export default function Dashboard() {
  return <div>Dashboard</div>;
}

Since the app is wrapped with the TurnkeyProvider component, the useTurnkey hook is available to all child components. Calling turnkey.getCurrentUser() will return the current user’s session information from local storage.

Add a state variable to store the user:

src/app/dashboard/page.tsx
import { useState, useEffect } from "react";
import { useTurnkey } from "@turnkey/sdk-react";

export default function Dashboard() {
  const { turnkey } = useTurnkey();
  const [user, setUser] = useState<User | null>(null);

  useEffect(() => {
    if (turnkey) {
      const user = turnkey.getCurrentUser();
      setUser(user);
    }
  }, [turnkey]);

  return <div>Dashboard</div>;
}

Sign Message

Turnkey supports signing arbitrary messages with the signRawPayload method.

The signRawPayload method requires these parameters:

  • payload: The raw unsigned payload to sign
  • signWith: The signing address (wallet account, private key address, or private key ID)
  • encoding: The message encoding format
  • hashFunction: The selected hash algorithm
1

The Payload

For simplicity, a human readable string, message, will be the payload to sign. Add a state variable to store the message and an input field to allow the user to enter the message:

src/app/dashboard/page.tsx
import { useState, useEffect } from "react";

export default function Dashboard() {
  //...

  const [message, setMessage] = useState("");

  //...

  return (
    <div>
      <input
        type="text"
        value={message}
        onChange={(e) => setMessage(e.target.value)}
        placeholder="Enter message to sign"
      />
    </div>
  );
}
2

The Signer

Signing messages requires a signer e.g. a Turnkey wallet address to sign with and a payload or message to sign. A new wallet is created for each user during the authentication flow.

Create a function called getSignWith, to get the user’s wallet account address which will be used to sign the message.

Use the getActiveClient method from the useTurnkey hook to get the client authenticated with the user’s read-write session:

src/app/dashboard/page.tsx
import { useState, useEffect } from "react";
import { useTurnkey } from "@turnkey/sdk-react";

export default function Dashboard() {
  const { turnkey, getActiveClient } = useTurnkey();
  const [user, setUser] = useState<User | null>(null);

  const getSignWith = async () => {
    // This will return the authIframeClient with the credential bundle injected
    const client = await getActiveClient();

    // The user's sub-organization id
    const organizationId = user?.organization.organizationId;

    // Get the user's wallets
    const wallets = await client?.getWallets({
      organizationId,
    });

    // Get the first wallet of the user
    const walletId = wallets?.wallets[0].walletId ?? "";

    // Use the `walletId` to get the accounts associated with the wallet
    const accounts = await client?.getWalletAccounts({
      organizationId,
      walletId,
    });

    const signWith = accounts?.accounts[0].address ?? "";

    return signWith;
  };

  useEffect(/* ... */*/);

  return (/* <div>...</div> */*/);
}
3

The Signing Function

Create a function called signMessage. This function will:

  • Get the user’s wallet account for signing the message
  • Compute the keccak256 hash of the message
  • Call the signRawPayload method

Note: To compute the keccak256 hash of the message, this example uses the hashMessage function from viem. However, any other hashing library can be used.

const signMessage = async () => {
  const payload = await hashMessage(message);
  const signWith = await getSignWith();

  const signature = await client?.signRawPayload({
    payload,
    signWith,
    // The message encoding format
    encoding: "PAYLOAD_ENCODING_TEXT_UTF8",
    // The hash function used to hash the message
    hashFunction: "HASH_FUNCTION_KECCAK256",
  });
};
4

Display

Add a button to the UI to trigger the signMessage function.

src/app/dashboard/page.tsx
import { useState, useEffect } from "react";
import { useTurnkey } from "@turnkey/sdk-react";
import { hashMessage } from "viem";

export default function Dashboard() {
  //...

  const [message, setMessage] = useState("");

  const signMessage = async () => {
    const payload = await hashMessage(message);
    const signWith = await getSignWith();

    const signature = await client?.signRawPayload({
      payload,
      signWith,
      // The message encoding format
      encoding: "PAYLOAD_ENCODING_TEXT_UTF8",
      // The hash function used to hash the message
      hashFunction: "HASH_FUNCTION_KECCAK256",
    });
  };

  return (
    <div>
      <h2>Sign Message</h2>
      <input
        type="text"
        value={message}
        onChange={(e) => setMessage(e.target.value)}
        placeholder="Enter message to sign"
      />
      <button onClick={signMessage}>Sign</button>
    </div>
  );
}

Recap

In this quickstart guide, you’ve learned how to:

  1. Set up Turnkey’s SDK in a Next.js application
  2. Configure authentication with email sign-in
  3. Create a protected dashboard route
  4. Implement message signing functionality using a user’s Turnkey wallet
  5. Handle user sessions and wallet interactions

Next Steps