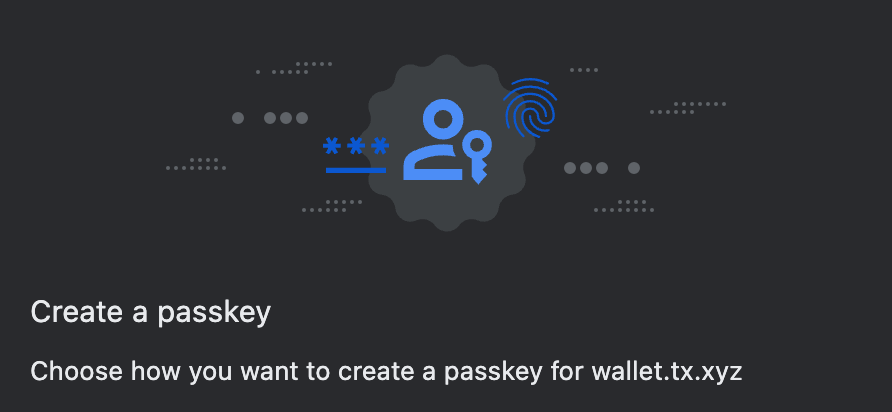
Registration options
Mozilla has good (but lengthy) documentation on each option: MDN documentation. Below we detail the most relevant options you’ll want to think about.challenge
This is the challenge signed by the end-user for registration. During registration this challenge isn’t meaningful so we recommend picking a random challenge. It will not be visible to users.
timeout
Number of seconds before “giving up”. The browser will simply show a timeout popup:

rp
The rp options is an object with 2 fields: id and name.
rp.id (aka RPID) should be your app top-level domain. For example, if your app is hosted on https://your.app.xyz the RPID should be app.xyz unless you have good reasons to do otherwise (see below).
Reasons to set RPID to specific sub-domains
Reasons to set RPID to specific sub-domains
rp.id, or RPID, is a way to identify the website a passkey is associated with. Once set at registration time, it determines the set of origins on which the passkey may be be used. The WebAuthn spec states that the RPID must be a “registrable domain suffix of, or equal to” the current domain. If the page creating a passkey is hosted at https://your.app.xyz, the RPID can thus be “your.app.xyz” or “app.xyz”.A passkey with RPID “your.app.xyz” cannot be used on https://www.app.xyz or https://foo.app.xyz. However a passkey created with RPID “app.xyz” will be usable on all https://*.app.xyz sub-domains: https://your.app.xyz, https://www.app.xyz, https://foo.app.xyz, and so on. Hence our general recommendation above to set app.xyz (top-level domain) as the RPID to maximize flexibility.A reason why you might want to set the RPID to “your.app.xyz” instead of “app.xyz” like recommended above is extra security: if you are worried about user passkeys being usable across all your sub-domains, it makes sense to scope passkeys to the sub-domain they’re meant to be used on, and only that sub-domain.If you scope passkeys to a specific sub-domain, be aware that migrating your app to a different sub-domain later will require a migration process where users have to re-enroll themselves by creating new passkeys on the new sub-domain. Passkeys cannot be transferred from one RPID to another.rp.id will show up in the initial registration popup:
rp.name doesn’t show up in the popup so can be set to anything. We recommend setting it to the correctly capitalized name of your app, in case browsers start showing it in their native UIs in the future.
attestation
This option indicates whether an attestation is needed, to prove the authenticator authenticity. In general, Turnkey doesn’t need attestations. Most passkeys do not produce meaningful attestations for privacy reasons. In the context of passkey integrations, you can omit this option: it will default to “none”.
pubKeyCredParams and alg
The pubKeyCredParams is a list of supported algorithms. If you’re relying on Turnkey to validate passkey signatures, this list should be: [{alg: -7, type: "public-key"}, {alg: -257, type: "public-key"}].
The integers -7 and -257 are algorithm identifiers for ES256 (aka P256) and RS256 (aka RSA), respectively. The full list of possible values is part of the COSE standard, maintained by IANA. Currently Turnkey only supports ES256 and RS256.
user
The user field has three sub-fields:
-
id: also known as “user handle”, isn’t visible to the end-user. We strongly recommend setting this to a random value (e.g.const id = new Uint8Array(32); crypto.getRandomValues(id)) to make sure a new passkey is created. Be aware: if you accidentally set this value to an existing user handle, the corresponding passkey will be overridden! This section of spec is clear on the matter: “the user handle ought not be a constant value across different accounts, even for non-discoverable credentials”. -
name: this will show up in the passkey list modal (see screenshot below). We recommend setting this to something the user will recognize: their email, the name of your app, or potentially leave this up to the user:

displayName: as far as we can tell this doesn’t show up in current browser UIs. It might show up in future iterations so it’s best to populate this with the same value asname.
authenticatorSelection
This option has lots of consequences for UX, and it has many sub-options, outlined below.
authenticatorAttachment
This option, if set, restricts the type of authenticators that can be registered. See the table below for the values this option can take and their effect on registration prompts (captured via Chrome on a MacBook Pro).
| Empty (default) | platform | cross-platform |
|---|---|---|
| If you want broad compatibility, leave this option empty, and the browser UI will allow for both internal and external passkeys. | If set to platform, only internal authenticators (face ID, touch ID, and so on) can be registered. | If set to cross-platform, only passkeys from other devices or attached via USB are allowed. |
 |  |  |
requireResidentKey and residentKey
These options allow you to specify whether you want your users to create discoverable or non-discoverable credentials. See Discoverable vs. non-discoverable for more information. Default values: residentKey is discouraged and requireResidentKey is false.
Important note: the default for requireResidentKey (discouraged) results in different outcomes based on OS: Android devices create non-discoverable credentials whereas iOS devices create discoverable credentials. If you want to create discoverable credentials whenever possible, set requireResidentKey to false and residentKey to preferred, which work across Android and iOS devices.
userVerification
“User verification” refers to mechanisms on the authenticators themselves such as PIN codes or biometric/fingerprint readers. This flag can be set to:
discouraged: yubikey PINs won’t be required even if the device technically supports it. We’ve found that for TouchID/FaceID, authentication will still be required however.preferred: yubikey PINs and other authentication mechanisms will be required if supported, but devices without them will be accepted.required: authenticators without user verification support won’t be accepted.
userVerification to “discouraged” or “preferred” because some authenticators do not support user verification.
Due to poor yubikey PIN UX in browsers, setting userVerification to “discouraged” is best unless you operate with a strict security threat model where user verification makes a big difference.
“preferred” is the default value if you don’t specify this option.
Authentication options
Mozilla’s documentation on authentication options can be found here: MDN documentation. Luckily there are fewer authentication options than registration.challenge
This is the challenge to sign with the passkey. If you’re integrating with Turnkey, the challenge should be the POST body of the request to be signed. Our SDK and helpers set this automatically for you already.
rpId
Must match the rp.id option during passkey registration. Passkeys are domain bound, so it’s not possible to use a passkey registered with rp.id set to “foo.com” and use it on “bar.com”. This is a core anti-phishing counter-measure.
allowCredentials
List of objects restricting which credentials can be used during authentication. This is crucial to specify if you’re using non-discoverable credentials or if you want to tailor browser prompts to the right type of transport.
Each object in this list has an ID (the credential ID) and a list of transports (e.g. “hybrid”, “internal”, “usb”, etc). The transports list is optional but results in better, more targeted prompts. For example, here are screenshot of targeted prompts captured on Chrome, on a MacBook laptop:
transports: ["internal"] | transports: ["usb"] | transports: ["hybrid"] |
|---|---|---|
 |  |  |
Buffer.from(storedCredentialId, "base64")) to avoid issues.
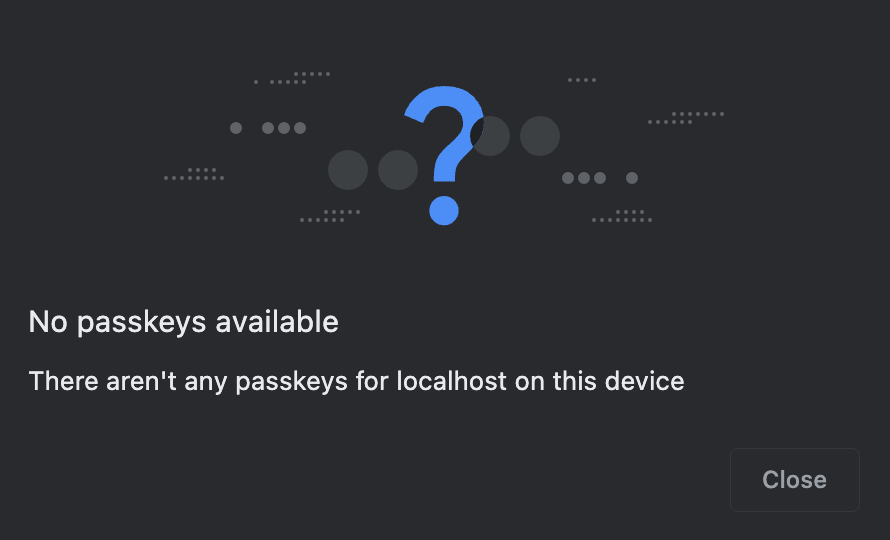
If the wrong credential ID is specified, transports: ["internal"] is set, browsers error right away because they can enumerate internal credentials. Chrome, for example, displays the following error:
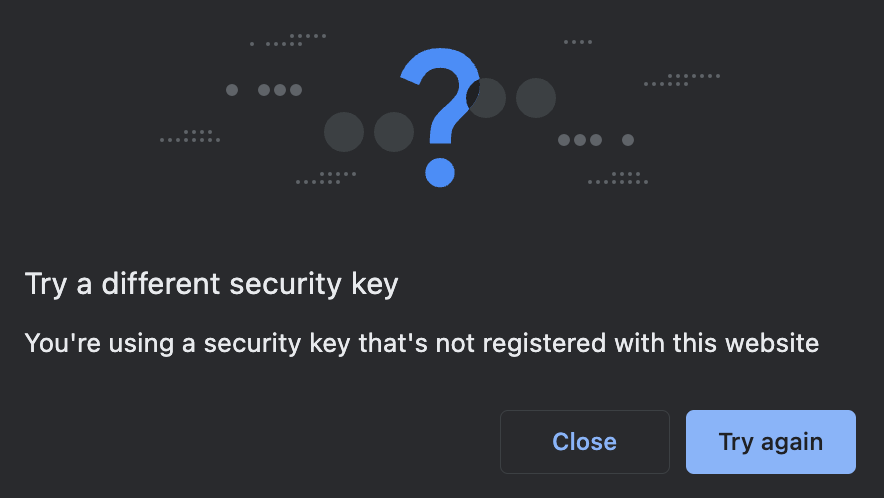
transports set (or with other-than-internal transports set), browsers won’t error right away because they can’t enumerate external credentials. They will display an error once the user has pressed their security key or gone through the cross-device passkey flow:
attestation
See attestation above.
timeout
See timeout above.
UserVerification
See UserVerification above.